Tuesday, August 12, 2014

Weekly and Monthly Data Sets

I have been data gathering for almost a month now.  Here is the last week's data.  Saturday and Wednesday were foggy days!  Typical SF summertime weather...


And for the last month:

When the panels where dry, before I turned on the controller/pump, the low was about the same, but the high was 190 C (375 F), not 90 C (194 F).  Most of the cooler days indicate presence of our lovely fog.

Tuesday, July 15, 2014

Data Logging: Results!

As of last night I completed hookup of the eighth 1-wire temperature sensor.  It is reading at the hot inlet to the mixing valve, which is also the outlet to my old 30 gallon hot water heater.  This will give me an idea of the performance of the mixing valve and it's settings, as the difference between the "Domestic Hot Water Supply" and the measurement read at this sensor is how much cold water is being mixed into my hot water supply.

The data that I am generating is being put, for each sensor, into an RRDtool database every 30 seconds.   I have no idea what a good sampling frequency is, so I settled on this one because it sounded about right.   I will probably blow away this database and recreate it a few times in the next week or so trying to get it 'just right'.

Here is the dataset for the last four hours today:


The lines I found most interesting are the roof (red), solar storage tank temperature (green) an domestic hot water supply (should be magenta, but looks red!).  DHW supply roughly shows the usage during the afternoon.  I very much dig the slow but steady rise of the storage tank temperature!


Tuesday, July 8, 2014

Time to start Datalogging

My system has been running for almost a year now.  I've been busy raising our twin girls, now a year old, and the solar system 'hobby' has faded into the background.  I get started getting tiny time slices for projects in the last couple months, usually between nine and ten at night on weeknights.  With some of that time my next addition to the system is data logging.

An Arduino Uno with ethernet shield and microSD storage was my first thought for a data logger.  It is economical, available with great libraries, sample code and forum support.  I got a little ways down the road using one and then realized it would be so much easier with a Raspberry Pi, add-on 16-bit ADC (ADS1115) and 1-wire thermal sensors (the ubiquitous Maxim ds18b20).  My money making gig is as a Linux administrator, so working with Raspbian on the Pi is a simple pleasure for me.  Also, getting Network Time Protocol (NTP) and a Real Time Clock (RTC) working on the Pi is simpler.  I ended up getting a DS1307-based RTC that works over i2c.  It's plenty accurate when paired with NTP which will give me good timestamps for my time series data.  To make interfacing all these devices easier to my Raspberry Pi, I'm using the Adafruit Pi Plate (see below).


The ADC is used to read voltages on the two temperature sensors (located at the panel output header and storage tank) that came with the Steca controller.  The voltage range that it presents is pretty small - 64F/2.040V - 176F/2.200 - so I'm happy having the 16-bit ADC rather than the Arduino's 10-bit ones.  In the image below you can see how I have used and orange and green pair from CAT5 cable to tap into the roof and storage tank thermal probe leads.


I ordered 10 1-wire sensors from Amazon that were nicely soldered onto cables with stainless shrouds protecting the sensors.   I hope they will withstand years of hot water temperatures.  Five of them are now patched into a 12-port patch panel which I am using as a combined 1-wire and ethernet patch panel.  The ethernet patch is for the Pi.  For the 1-wire bus, three conductors in the CAT5 cable - blue (data), green (ground), and orange (power) - will extend the sensor wire to the panel.  I'm using 568B wiring style in all the jacks regardless of whether it's ethernet or 1-wire.  I borrowed a buddy's 110 impact punch down tool to connect all the wires easier (Thanks Peter!).  Here's the back of the patch panel:
Happily all the 1-wire sensors are working.  I'm happy about this as each sensor connection required crimping one RJ45 jack, soldering three leads and punching down three wires.  There was plenty to screw up and I didn't.  woO!  The two ADC connection to the roof and storage tank temperature sensors are also reporting their temps to a python script that uses the adafruit ADS1115 libraries.  The completed setup is below.  I'm kind of dreading writing all the code - there are a lot of decision to make about it - but at least most of the HW setup is done.


Monday, July 29, 2013

Since I last entered anything on this blog I had twin girls and my baby is now almost four years old.  How time flies!

Today I plugged in the Grundfos pump and after a few minutes felt the return pipe get very hot.  It was a cloudy day here in SF, so I took that to be a good sign.  Shortly after the pipe heated up, the flow dropped to zero even as the pump worked hard to move the water.   At this point I had only added five gallons of tap water.  The drainback tank is 7.5 gallons, the heat exchange loop in my SunEarth tank is 2.2 gallons and the balance of piping is maybe another 0.5 gallons.  That makes around 10 gallons of water to fully fill the drainback tank, which is above the height of the heat exchanger, pump and balance of piping.  After adding another ~5 gallons, the water flowed once more and the bubbles began to get smaller, then mostly disappear.

I used tap water to simply flush the system of flux and 'funk' before adding distilled water.

I found that I needed to run the pump awhile to fully charge the system.  I suspect air gets trapped here and there, and needs a good push to get evicted.

All the plumbing is finished.  I now need to:

1. Insulate the the inside piping.
2. Solder the temperature probe on the roof to the bell wire that I've run up to the panels and run that to the array outlet.
3. Find a source for outdoor grade pipe insulation and install.
4. Add Reflectix insulation to exposed parts of the drainback tank and add a layer of it to the storage tank.
5. Test the Steca controller and then choose settings for it.

woO!

Thursday, September 6, 2012

Panels Racked


 Two weekends ago Jeff (background) and Ron (foreground) from GRID Alternatives installed the panels on the racking system.  I helped out, but mostly just tried to stay out of their way.  Although I toyed with doing this myself with the help of a friend, it went so fast and smoothly employing Ron and Jeff.  They are the real deal!   Here they're surveying the roof for rack layout.  They discovered that my east-west running roof rafters had a few bends in them, resulting in a couple extra holes in the roof.  I wasn't worried as I knew the flashing and added roll roofing would plug them. Their tape is oriented 15 degrees east of due south. 

 Both chalk lines are snapped (fluorescent orange).  The bottom and top rails will anchor to the FastJacks that dot these lines.  There are a total of six them.  The sealent under the jacks is a Geocel roof caulking product (GeoGreen 4500?).  Stainless steel lag bolts hold the jacks to the roof.  Final tightening of the bolts is done manually with a ratcheting socket wrench. 
 Bottom end panels will be anchored at the above three jacks. 
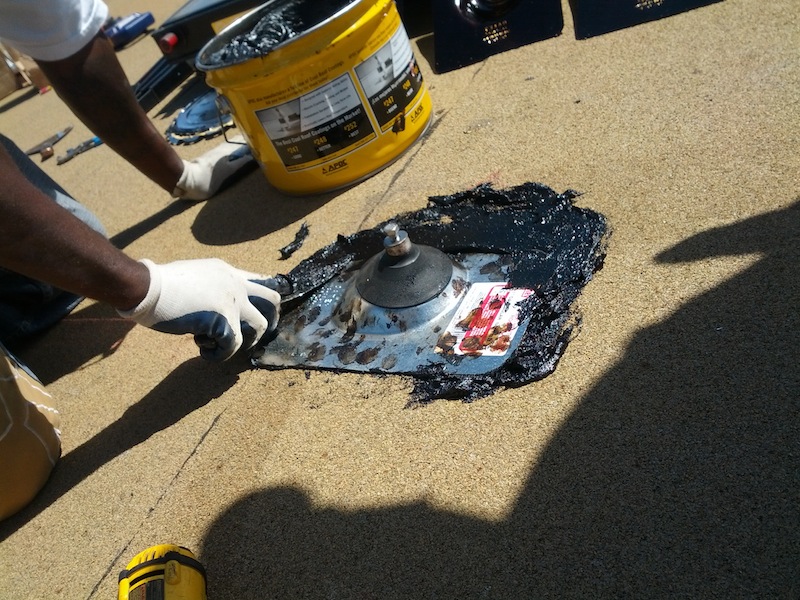
Ron starts applying APOC 133 roof sealant around jack.   Behind him you can see the Oatey flashing that have been sprayed with the sealant primer - a sticky black coating on both sides. 
 
 Oatey solar roof flashings come next.   The above flashing didn't have the sticky spray applied to it, so we had to remove it and try again.  Over the APOC 133 we placed strips of fiberglass tape (not shown)  to help strengthen the sealant layer.

 Ron is using an inclinometer to make sure that the back rail will accomodate a 45 degree panel tilt.

The Oatey flashing and the area around it is covered in APOC 133, then the roll roofing material is laid over.  Each piece is 2'x2'.

  
The stainless "self-tapping" screws that came with the SunEarth RexRack did not want to penetrate the rails.  They're tough rails!  So were were forced to predrill the rails first.  We broke a total of three bits doing this.  Ron remarked that he'd not worked with such recalcitrant rail before.

 Ron checks the tilt on the lower rail, making sure that it was set properly to 45 degrees.
The back rail is fully installed.  

 The two 4'x8' panels are up and mounted.  The headers on these panels have not been coupled, they're just clamped to the rails.  Now it's up to me to sweat two couplers on the middle heaters to attach panel to panel.  On the outside headers I need to cap one on the top and one on the bottom.  The other two outside headers need 1" to 3/4" reducing fittings installed and elbows to point back to the supply pipes.  I need to determine if this system requires pressure relief valve or not given that it's a drainback design. 

Thursday, August 30, 2012

Goop on the Roof

 The roof penetrations for the plumbing are flashed and sealed.  The process involved:

1. Wire brushing the existing gravel surface of my rolled roofing. 
2. Applying a 3-5 mm layer of the APOC 133 roof sealant. 


3. Back buttering the Oatey `Solar' flashings with APOC 133 and sticking them on the roof.
4. Forgetting to pull the sensor wire through the flashing.  (DOH!)
5. Overlapping the flashing and threading them down the plumbing pipes. 

6. Covering the flashing with more APOC 133.  
7. Cutting a square of bitumen rool roofing to cover the goo.
8.  Peeling backing off roll roofing and laying it over the good.  


9. Rolling and patting down the rool roofing so that it makes a good bubble-free bond with the existing roof. 

I have some thin sheet aluminum that I'm going to use to make `parasols' for the rubber boots on these flashings.  Maybe instead of getting 10 years out of the rubber, I'll get 30.  As a result of forgetting to pull the sensor wire, I'll have to lift the edge of one of the boots and probably use a stiff wire to pull the bell cord sensor wire. woO.

Wednesday, August 8, 2012

Solar Roof Flashings

Yesterday I fitted up the flashings that I'll be using for the 3/4" supply pipes that go to and from the collectors.  As the pipes are quite close, the top flashing required some trimming with my yellow handled Wiss snips.  The cutout I made allowed for flush layup of the flashings.  My friend Ron at GRID Alternatives recommends that I seal these flashings with APOC 133 caulk as it's usually what they use on this type of roofing (aggregate on bitumen), over which I'll adhere a layer of bitumen.  Tomorrow I'll be going to Western Gravel and Roofing Supply to get tubes of this stuff.  Ron has agreed to come over to help racking the panels on August 26th.  There's some small chance that I'll make time to finish this project myself, but I'll probably wait for Ron as I haven't enough experience in racking panels, flashing, and finding roof joists under built up roof membranes.  More soon!